Stone Carving Tutorial
How to Carve Stone
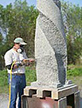
The following is a brief overview on how to carve stone. It obviously cannot cover all aspects of stone carving in such a limited space. At the bottom of this page, a selected bibliography will direct you to other sources describing the carving process in more detail.
A word on Safe Stone Carving:
The first rule of safety when carving stone with hand or pneumatic tools, is to wear safety glasses. Depending on the type of stone, the chips thrown during carving can be as sharp as glass shards. Your eyes are your most valuable tool; protect them.
A quality dust mask is required when carving or sawing some stones, especially those containing silica, like granite, or talc, like soapstone. It is good advice to always wear a respirator when creating any kind of dust.
Wear ear plugs to protect against the noise produced by pneumatic tools and diamond saws.
Anti-vibration gloves protect hands from the constant vibration of pneumatic tools. Wrist support will help prevent carpal tunnel injury.
Keep a well-equipped first aid kit handy.
Planning:
There are two basic approaches to carving. The first is to find a stone with a distinctive shape or color pattern that suggests sculptural forms. This approach frees the carver to follow the natural forms within the material. The qualities of the stone itself become a major influence in determining the direction of the sculpture.
The second approach is to begin by working out an idea for the sculpture in drawings or by modeling a maquette in clay or other easily worked material. Modeling in clay first, when you can add and subtract material, push and twist the forms around, and try different form combinations, frees the carver to develop the sculptural idea without worrying about taking off a chunk of stone that, as ideas change, he might later wish to have back.
Layout
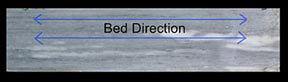
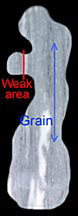
Before you begin carving, look at the stone to determine the direction of the bed, or "grain" (similar to wood). In sedimentary, metamorphic, and to a lesser extent, igneous stone, the stone was formed by the accumulation of roughly parallel layers of material built up over time. Wetting a sedimentary or metamorphic stone with water will help display these bed lines, often appearing as distinctive color patterns.
Stone will tend to break more easily when split along these bed lines, like opening the pages of a book. And, like trying to tear a phone book, it is more difficult to break (or tear), and breaks less predictably when the direction is perpendicular to the bed lines.
As in laying out a design for a wood carving, with stone you must also consider the direction of the grain to ensure the structural integrity of the parts of the sculpture. Try to keep the grain running with the length of the design, and avoid thin projections that protrude perpendicular to the grain.
Once you have determined the direction of the bed, check to see if there are any hair-line cracks in the stone that could open up and break off later during carving. Pour water on the stone. The last part to dry can indicate a crack. Tapping the stone and listening to the change in pitch can help find a crack.
Now begin drawing your design on all sides of the stone. Make sure to project the same height and width of each form on to the other sides of the stone.
Having at least a rough drawing or maquette will help insure a better chance of resulting in a successful carving. Once you carve the stone off, you can't put it back on.
Roughing out
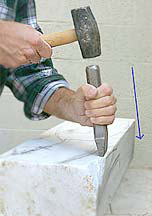
The quickest way to remove a lot of stone form a block is with the pitching tool. To use this tool, the stone must have a flat surface and squared corners. Place the pitching tool about 1 1/2" from the edge of the stone. Hold it straight up and down, then tilt it back slightly so that the force is directed towards the area you want to break off. With one sharp blow, break off the edge. You will be sending a shock wave through the stone. Do not direct it straight down into the block, but out and to the outside.
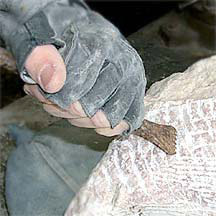
After removing as much material as possible with the pitching tool, begin to define the shapes with the point chisel.
Hold the chisel with your thumb on the top side of the chisel. It feels awkward at first, but helps prevents accidentally striking your thumb with the hammer.
Start carving by cutting parallel rows about an inch apart in the stone, creating ridges and grooves. Hold the chisel at an angle that just bites into the stone, but not so steeply that it will bury the tool. Try not to direct the chisel too deeply into the stone, which will result in pulverizing the stone directly under the point and producing a white blemish, or 'stone bruise.' These white marks require a lot of additional work to remove when polishing.
Now go back over the same area with a cross-hatch pattern of cuts
to knock off the ridges of the first cuts. Place the point so it
catches under the ridge and the impact force pops the chip off.
Using this technique, begin defining the geometric planes of the forms. Work all areas of the sculpture simultaneously so that the entire
carving is always at the same stage of completion. In this
manner you can make more accurate visual judgments about how to proceed.
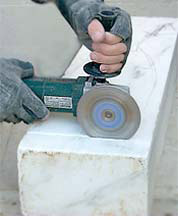
A 4 1/2" diamond blade on a grinder can speed up the removal of stone. Make a series of parallel cuts about 1" apart.
Then break them off with the point chisel.
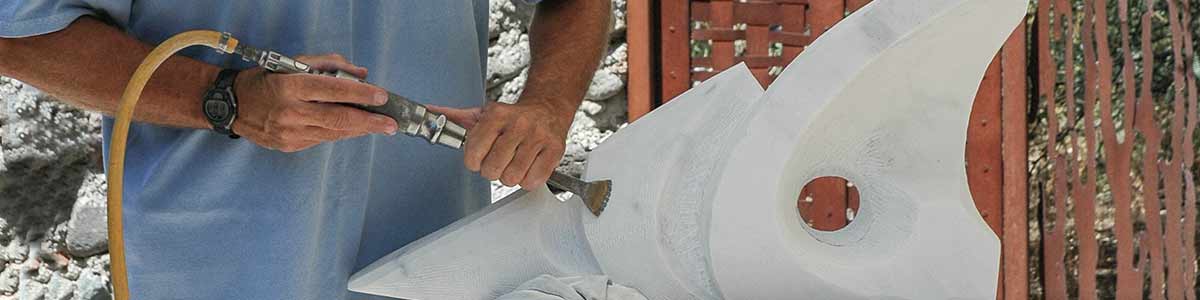
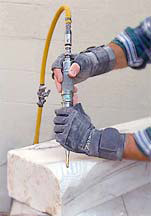
All of the hand-carving chisel shapes, the point, tooth, flat, and rondel, are also made to work with pneumatic hammers.
The pneumatic hammer's multiple strokes-per-second saves time and reduces some of the physical work of carving. Its smooth action can cut a more flowing line through the softer stones.
The pneumatic hammer's rapid fire action, when used with bushing chisels (4 point, 9 point, and cup chisel), make it a very effective tool for more refined shaping with the harder stones, like granite.
Pneumatic hammers come in different size from the large 1 " hammer for roughing out, to the 1/2", or smaller, for fine detail work. The air pressure to the tool can also be adjusted to increase for more power or reduced for finer control.
Defining the Forms
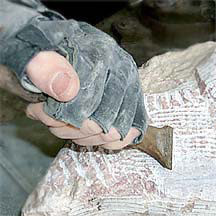
Once the large forms have been established with the point chisel, begin refining them with a tooth chisel. The point chisel has left a rough texture of grooves and ridges which can be smoothed down with the tooth chisel.
The tooth chisel closely follows the contours of the forms. Hold the chisel at about a 45 degree angle. A higher angle only bruises the stone; a lower angle just skips over the surface. As with the point, try to catch the tool under a ridge of stone to pop it off.
A flat chisel is now used on flat or convex forms to remove the texture left by the tooth chisel. Use the curved edge of the rondel chisel to clean out concave shapes.
During this cleaning up stage, you will discover if you have bruised the stone and need to do extra work to remove the white marks.

Finishing
On the softer stones, rasps and rifflers are used for the final smoothing and shaping of the carving. The coarse teeth of a cabinet maker's rasp or round rasp, when used in long sweeping strokes, produces graceful flowing forms.
On harder stones, a flat chisel is used to remove the ridges left by the tooth chisel.
The 9 point bushing chisel can be used on granite to smooth the surface. A diamond cup wheel on a mini grinder will remove the rough surface left by the bushing tools.
The smaller rifflers with their varied shapes can get into small areas or complex shapes. On the softer stones, much of the detail carving can be done with rifflers.
Final smoothing is done with wet/dry silicon carbide sand paper.

Polishing:
Polishing brings out the beautiful color and pattern of a stone. With the softer stones, continue hand sanding with the wet/dry sand paper under running water. Work through the grits (by roughly doubling the number of the last grit) from 50 grit to your desired degree of polish (somewhere between 600 to 3,000 grit).
On the harder stones, I use a pneumatic polisher with a center water feed and diamond pads in an assortment of grits from 40 to 3,000.
After you are finished thoroughly going over the piece with a particular grit, let the stone dry. Check to see if there are any scratches or other imperfections that were not removed by the last grit. Mark the blemishes with a colored pencil and go over the area again with the last grit until all the blemishes are removed before proceeding to the next finer grit.
If you have gone through all the grits, but did not stop and dry the stone to check for scratches, at the end you may be shocked to find scratches left in the otherwise beautiful finish. Now you have to go back to a previous grit that you think will take out the scarch, and go through the higher grits again.

Follow the step-by-step of carving a 5 ton block of granite, from roughing out, to using pneumatic tools, to polishing for the finished look. Visit granite carving.
Watch a YouTube video on now to carve a marble sculpture from start to finish. Visit Carving Marble.
Watch how to carve a sculpture in onyx and marble, including repairing a crack in the stone. Visit Carving Onyx.
Here is a short video on polishing some small alabaster stone carvings. Visit Polishing Alabaster.
Books on Stone Carving
Direct Stone Carving, Milt Liebson, Schiffer Publishing, Ltd., West Chester, PA, 1991.
Contemporary Stone Sculpture, Dona Z. Meilach, Schiffer Publishing, Ltd., West Chester, PA, 1970.
Sculpture, Arthur Williams, Davis Publications, Inc., Worcester, MA, 1989.
![]()
Follow my Face Book page, The Sculpture Studio LLC to see more in-progress photos of making sculpture.
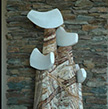
Stones for Carving
Types of stone for carving.
Tools for Stone Carving
See some of the tools used for stone carving.